Loading basket...
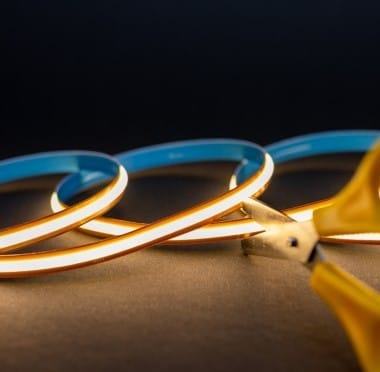
Where can you cut a COB LED Strip?
You cannot pick a pair of scissors and cut a strip of COB LED wherever you want. The patterns of strips are designed using certain circuit patterns, and each part of such a pattern is intended. The possibility of cutting the circuit in the wrong spot can destroy the circuit in that strip and render the entire piece useless.
COB (Chip-on-Board) LED strips do not resemble conventional LED strips in any way. COB technology incorporates hundreds of small LED chips tightly packed on a single board as opposed to positioning individual LED bulbs at increments. This shape means that the light produced by it is continuous and non-stippled; there are no dots that can be seen, just a solid line of light. Since these chips are soldered directly on the circuit board, all the millimeters of the strip contain fragile copper contacts supplying power to each chip.
In order to add protection to these circuits, manufacturers produce certain points of cut to the strip. These are simple to spot - they are usually highlighted by a small scissors indicator, a slender line, or two copper pads. These marks are the ones that indicate the point where the strip can be safely cut without degrading or interrupting the electrical pathways.
You can cut in any other place, between the LEDs or when crossing a solder joint, and there is a high probability that the copper tracks will be cut. When they are damaged, the current will not be able to pass through the circuit, and the circuit will be dark or the strip will be entirely dead.
How to Cut COB LED Strips?
It is easy to cut a strip of COB LED; however, one needs details. Here's the correct way to do it:
- Locate the cut marks: These marks are spaced evenly in the strip, normally every few centimeters. The separation varies according to the strip model and its voltage (eg, 12V or 24V).
- Examine the strip closely: Always inspect in the light before making the incision. You will see little dots of copper, or a very slender white streak - there you are to cut.
- Sharp scissors or a precision knife should be used in the line precisely. It will slice and break the strip even with the slightest diversion.
- Cut straight across. Do not cut on the diagonal; this will expose or slice through the metal contact in an uneven manner.
- After you cut, you are left with two ends, one of which you must fit back again.
Where to cut?
You may only make cuts at the marked or at the point before the line. A cut in the incorrect position can be used to rupture the electricity between the sections. Also, avoid cutting through:
- The LED chips themselves.
- Connections between chains of circuit.
- The silicone coating (assuming that your strip is waterproof).
Each strip of COB circuit is an assembly of repeating circuits that could operate on their own when properly powered. Any type of cutting outside those lines disconnects the continuity of the circuit, so no electricity will go through it, and some part of your strip will no longer light up.
Why do LED lights not work after being cut?
In case of an unexplained stop of your LED strip when you have a cut, then it is most likely caused by one of the three following problems:
- If cut in the wrong place, this disconnects the circuit that has the LEDs.
- Poor connection: The cut ends have not been correctly soldered or attached to a matching connector.
- Polarity error: The right and left sides are not connected properly during the reconnection.
The LEDs in COB are densely compact, and the internal circuitry of the LEDs is finer and smaller compared to the old SMD strips. That is to say that any slight maladjustment or lack of contact can disable them. This is to be checked at all times, and the copper pads should always be in contact with the metal pins of the connector.
Is it possible to cut the LED strip anywhere?
The quick answer - no, you can't. Continuous phosphor and chip are bonded to the board of the COB LED strips. Compared to older strips of LED with the individual LED bulbs and with larger spacing, the COB strips are one compact unit. Random cutting will result in the destruction of the bond between the chips and copper tracks.
You can make it shorter, too, as long as you only cut at the indicated intervals. Once you have cut, you can reassemble pieces with connectors that are compatible with COB, or you can solder wires between the copper pads. And at the same time, consider polarity: being positive (typically indicated by by plus), and negative is wrong on both sides.
It is also very nice to apply silicone sealing wood or heat-shrink tubing to the open ends when the strip will be exposed, or is going to be exposed to the outside or the damp. This is used to ensure that the copper pads are not oxidized or shorted in case of moisture.
Guidelines to a Clean and Safe Connection
- Measure twice, cut once. Planning before you cut your layout.
- Test before installation. Temporarily connect the strip to power just to ensure against lightning.
- Use quality connectors. The cheap connectors tend to untighten themselves with time, resulting in flicker or dead zones.
- One should not bend along the line of the cut. Angular curves may crack the circuit or loosely fit the chips.
Summary
COB LED strip is not hard to cut, though it is very precise. Always find the cut points, find the marked ones, work with sharp tools, and join the ends. Any cutting between the LEDs or cutting through soldering joints will snap the internal copper paths, and that makes the strip useless.
Once it is cut, make sure to ensure that the connections are tight, the polarity is correctly matched, and that the strip is lit evenly. And once correctly assembled, your COB LED strip will continue to shine with uniform bright light just as it is intended and last just like it is intended.
Created by Vaibhav Gupta on 24th October, 2025
Author
| | Vaibhav Gupta
|


Mark Delaney
18th February 2026
Just awesome service. Super fast and well packaged delivery. Great communication throughout process. And additionally, I forgot to purchase 2 extra items in my original order resulting in extra delivery charges had I not just emailed to ask - and they were so helpful and generous and helped me out! Will be sure to recommend and re-order. Thanks again.
Diana
8th February 2026
Easy to navigate site, with very wide range of products for both professional and non-professional.
